Normally I wait until the end for the big “reveal”, but this is too cool not to show off:
Our first implementation of zones involved creating a plane object with a scripted texture. Color and text were passed to the object which would draw the text on a canvas and apply it to a Material Instance. And of course, it had the same positioning code as the torch.
However now that we’re making use of UDK’s ScaleForm UI, I thought we could pull off some pretty spectacular effects with Flash. We’re not including text (yet), but the tradeoff is worth it. Like the grid, it takes a LOT less code to implement the zones in Flash.
We’ll continue to use our existing BMSpawn, BMInteract, BMModify and BMDelete functions to start things off, but all the work will done in similar functions in ActionScript. Essentially, we’ll blindly “toss up” the commands to ActionScript and let it handle them with its own Spawn, Interact, Modify, etc.
First, let’s update our UnrealScript functions.
BattleMapGfxHud.uc
Add the following wrapper functions to BattleMapGfxHud. Note that most of these do not expect a return value. We’re just forwarding the command along. The UnrealScript code doesn’t care how ActionScript handles it. Except for InteractObject(), and all we need to know there is if we actually did click on something.
We need to extend our existing functions for new “zone” objects. In BMSpawn(), add this to our switch statement:
The BMInteractObject() function tracks what we selected. In this case, we don’t necessarily know the specific item since ActionScript is handling it. So, we’ll just track that our CrossHairMovie object is selected since we know something in there is. (Yes, in hindsight, “CrossHairMovie” probably wasn’t the most appropriate name for that. Note to self: fix that later…) In the first switch statement which stops selecting, add:
After the next switch statement that determines what we selected, add this CallInteractObject() check. If ActionScript tells us that it selected something, then we track that the CrossHairMovie has something:
Yes, the case parameter is correct. The switch statement checks the first 14 characters of the object type, not the name.
Replace the entire BMDeleteObject() function with the code below. We need to add an “object deleted?” check throughout the function. Since it would be easier to click inside a large zone than a torch, we want to track if we actually deleted an UnrealScript object first so that we don’t accidently delete multiple items in both UnrealScript and ActionScript. If nothing was found, then we pass the command along:
DefaultInput.ini
We need three more keybindings for spawning a zone and swapping an object:
Photoshop/Gimp
Now, something new. The zones are three layered images rotating in different directions animated in Flash. The runic circles themselves are brushes from Obsidian Dawn. At the bottom of their page, they provide instructions for importing and using the brushes. Essentially, we:
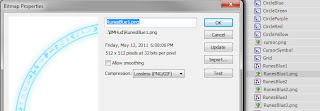
To get the circles animating, import the individual images into Flash. Don’t forget to update the properties of each PNG file to “Lossless (PNG/GIF)” Compression, otherwise they won’t import into the UDK:
![]()
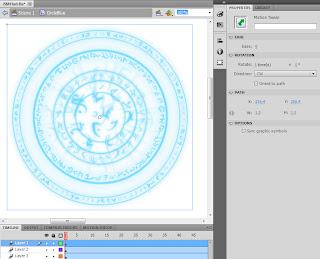
Next, create a new Symbol. Just as in Photoshop/Gimp, create three layers and put a rune image in each later. (If you lined them up correctly before cropping/saving earlier, then here you simply need to stack them perfectly on top of each other. If not, you can still make fine adjustments here.)
Insert a frame way out on the timeline for however long you want the animation to run. Ours goes 360 frames, which is 15 seconds at 24 fps. We didn’t want to cause epileptic seizures with fast spinning circles. Create a motion tween on each later, setting the number of rotations and the direction:
![]()
Once you’re done creating your runic circle, edit the symbol’s properties in the library:
Once you’re done creating all your circles, we just need to add object manipulation functions to ActionScript. First, a simple Spawn function:
Next, a function to create a zone. This function will perform a double duty. It will create a brand new zone, as well as replace an existing one. It does that by creating a zone at the same level as an existing one. (Flash allows one movieclip per level.) So, the function accepts input parameters to predefine a zone’s color and shape, or sets defaults if none are provided.
To keep things simple, we’re also performing some slight-of-hand with the movieclip’s properties. We need to track two things: which symbol this zone is using and what level it’s on. Rather than creating a custom class to extend movieclip for two properties, we’re going to appropriate existing properties. We’ll attach the level to the zone’s name (since both the level and the name need to be unique anyway, it seemed a good fit), and store the type of symbol in the taborder property.
“Wait, what?” Yeah, that’s kinda tricky. Flash doesn’t provide a property to determine what linkage type a symbol instance was created from. So, we’ll store our linkage names in an array then save the individual index in the taborder property – also an integer value. Which as it turns out, makes it easy to swap instances since we simply need to rotate the index number:
ModifyObject(), again, works just like the UnrealScript version. It determines what’s selected, then takes an appropriate action. For a zone, we modify the scale:
Now, fire up the UDK Editor and reimport your BMHud SwfMovie. Make sure the package also imported all your circle images. I’m not sure when it was fixed, but the FrontEnd is now smart enough to detect the updated package so you shouldn’t have to manually copy it into the CookedPC folder.
Last but not least, by request, a way to toggle the debug text.
DefaultInput.ini
Bind a key for toggling debug mode:
Add a function for toggling debug mode:
At the top add a declaration for a DebugMode variable:
BattleMapHUD.uc
In the PostRender() event, wrap the debug string and DrawText() in a condition:
BattleMap mode source files
Our first implementation of zones involved creating a plane object with a scripted texture. Color and text were passed to the object which would draw the text on a canvas and apply it to a Material Instance. And of course, it had the same positioning code as the torch.
However now that we’re making use of UDK’s ScaleForm UI, I thought we could pull off some pretty spectacular effects with Flash. We’re not including text (yet), but the tradeoff is worth it. Like the grid, it takes a LOT less code to implement the zones in Flash.
We’ll continue to use our existing BMSpawn, BMInteract, BMModify and BMDelete functions to start things off, but all the work will done in similar functions in ActionScript. Essentially, we’ll blindly “toss up” the commands to ActionScript and let it handle them with its own Spawn, Interact, Modify, etc.
First, let’s update our UnrealScript functions.
BattleMapGfxHud.uc
Add the following wrapper functions to BattleMapGfxHud. Note that most of these do not expect a return value. We’re just forwarding the command along. The UnrealScript code doesn’t care how ActionScript handles it. Except for InteractObject(), and all we need to know there is if we actually did click on something.
function CallSpawn(string Param1)BattleMapPlayerInput.uc
{
ActionScriptVoid("Spawn");
}
function int CallInteractObject()
{
local int ObjectFound;
ObjectFound = ActionScriptInt("InteractObject");
return ObjectFound;
}
function CallModifyObject( int Param1 )
{
ActionScriptVoid("ModifyObject");
}
function CallDeleteObject()
{
ActionScriptVoid("DeleteObject");
}
function CallSwapObject( int Param1 )
{
ActionScriptVoid("SwapObject");
}
We need to extend our existing functions for new “zone” objects. In BMSpawn(), add this to our switch statement:
case "Zone":
BattleMapHUD(myHUD).CrossHairMovie.CallSpawn("Zone");
break;
The BMInteractObject() function tracks what we selected. In this case, we don’t necessarily know the specific item since ActionScript is handling it. So, we’ll just track that our CrossHairMovie object is selected since we know something in there is. (Yes, in hindsight, “CrossHairMovie” probably wasn’t the most appropriate name for that. Note to self: fix that later…) In the first switch statement which stops selecting, add:
case "CrossHairMovie":
BattleMapHUD(myHUD).CrossHairMovie.CallInteractObject();
ObjectSelected = none;
break;
After the next switch statement that determines what we selected, add this CallInteractObject() check. If ActionScript tells us that it selected something, then we track that the CrossHairMovie has something:
if(BattleMapHUD(myHUD).CrossHairMovie.CallInteractObject() > 0)In the BMModifyObject() switch statement, pass the modifier along:
{
ObjectSelected = BattleMapHUD(myHUD).CrossHairMovie;
}
case "BattleMapGfxHu":
BattleMapHUD(myHUD).CrossHairMovie.CallModifyObject(Modifier);
break;
Yes, the case parameter is correct. The switch statement checks the first 14 characters of the object type, not the name.
Replace the entire BMDeleteObject() function with the code below. We need to add an “object deleted?” check throughout the function. Since it would be easier to click inside a large zone than a torch, we want to track if we actually deleted an UnrealScript object first so that we don’t accidently delete multiple items in both UnrealScript and ActionScript. If nothing was found, then we pass the command along:
exec function BMDeleteObject()Finally, add a new BMSwapObject() function. Our ModifyObject() function increases an item’s size, for example, but BMSwapObject() will exchange it for something else. Like different blood decals, or a sunrod in place of a torch, or different types of zones:
{
local BattleMapTorch To;
local BattleMapBlood Bl;
local bool ObjectDeleted;
if (WorldInfo.NetMode == NM_Standalone || WorldInfo.NetMode == NM_ListenServer)
{
ObjectDeleted = false;
switch(ParseObjectName(ObjectUnderMouse))
{
case "Torch":
foreach DynamicActors(class'BattleMapTorch', To)
if (To.Name == ObjectUnderMouse)
{
To.Destroy();
ObjectDeleted = true;
}
break;
case "Blood":
foreach DynamicActors(class'BattleMapBlood', Bl)
if (Bl.Name == ObjectUnderMouse)
{
Bl.Destroy();
ObjectDeleted = true;
}
break;
}
if (!ObjectDeleted)
BattleMapHUD(myHUD).CrossHairMovie.CallDeleteObject();
}
}
exec function BMSwapObject(int Modifier)
{
if (WorldInfo.NetMode == NM_Standalone || WorldInfo.NetMode == NM_ListenServer)
{
if (ObjectSelected != none)
{
switch(Left(ObjectSelected, 14))
{
case "BattleMapGfxHu":
BattleMapHUD(myHUD).CrossHairMovie.CallSwapObject(Modifier);
break;
}
}
}
}
DefaultInput.ini
We need three more keybindings for spawning a zone and swapping an object:
.Bindings=(Name="Z",Command="BMSpawn Zone")
.Bindings=(Name="LeftBracket", Command="BMSwapObject -1")
.Bindings=(Name="RightBracket", Command="BMSwapObject 1")
Photoshop/Gimp
Now, something new. The zones are three layered images rotating in different directions animated in Flash. The runic circles themselves are brushes from Obsidian Dawn. At the bottom of their page, they provide instructions for importing and using the brushes. Essentially, we:
- Created three layers in a transparent image
- Chose a color
- Painted a large, medium and small runic circle on its own layer
- Align the circles
- Crop and resize the image to a power of 2 (256x256, 512x512, etc.)
- Save as PNG into the .\UDKGame\Flash\BMHud\BMHud folder along with the cursor
To get the circles animating, import the individual images into Flash. Don’t forget to update the properties of each PNG file to “Lossless (PNG/GIF)” Compression, otherwise they won’t import into the UDK:
Next, create a new Symbol. Just as in Photoshop/Gimp, create three layers and put a rune image in each later. (If you lined them up correctly before cropping/saving earlier, then here you simply need to stack them perfectly on top of each other. If not, you can still make fine adjustments here.)
Insert a frame way out on the timeline for however long you want the animation to run. Ours goes 360 frames, which is 15 seconds at 24 fps. We didn’t want to cause epileptic seizures with fast spinning circles. Create a motion tween on each later, setting the number of rotations and the direction:
Once you’re done creating your runic circle, edit the symbol’s properties in the library:
- Enable “Export for ActionScript”
- Enable “Export in frame 1”
- Enter an identifier. Ours are CircleXXX. (CircleBlue, CircleGreen, CircleRed, etc.)
Once you’re done creating all your circles, we just need to add object manipulation functions to ActionScript. First, a simple Spawn function:
function Spawn(Param1:String)
{
switch(Param1)
{
case "Zone":
SpawnZone();
break;
}
}
Next, a function to create a zone. This function will perform a double duty. It will create a brand new zone, as well as replace an existing one. It does that by creating a zone at the same level as an existing one. (Flash allows one movieclip per level.) So, the function accepts input parameters to predefine a zone’s color and shape, or sets defaults if none are provided.
To keep things simple, we’re also performing some slight-of-hand with the movieclip’s properties. We need to track two things: which symbol this zone is using and what level it’s on. Rather than creating a custom class to extend movieclip for two properties, we’re going to appropriate existing properties. We’ll attach the level to the zone’s name (since both the level and the name need to be unique anyway, it seemed a good fit), and store the type of symbol in the taborder property.
“Wait, what?” Yeah, that’s kinda tricky. Flash doesn’t provide a property to determine what linkage type a symbol instance was created from. So, we’ll store our linkage names in an array then save the individual index in the taborder property – also an integer value. Which as it turns out, makes it easy to swap instances since we simply need to rotate the index number:
var Zones:Array = Array("CircleBlue", "CircleGreen", "CirclePurple", "CircleRed", "CircleYellow");Implement the InteractObject() function to handle clicking an item. This works exactly like its UnrealScript counterpart. On each mouse click it first stops interacting with whatever may be currently selected, then tries to find a new item to select:
// Param1:Name, Param2:Index, Param3:x, Param4:y, Param5:scale
function SpawnZone(Param1:String, Param2:Number, Param3:Number, Param4:Number, Param5:Number)
{
var ZoneName = (Param1 != undefined) ? Param1 : GetNextZone();
var ZoneIndex = (Param2 != undefined) ? Param2 : Math.floor(Math.random() * Zones.length);
var ZoneX = (Param3 != undefined) ? Param3 : _root._xmouse;
var ZoneY = (Param4 != undefined) ? Param4 : _root._ymouse;
var ZoneScale = (Param5 != undefined) ? Param5 : 70;
var ZoneLevel = int(ZoneName.substr(4));
var z1 = _root.attachMovie(Zones[ZoneIndex], ZoneName, ZoneLevel);
z1._x = ZoneX;
z1._y = ZoneY;
z1.tabIndex = ZoneIndex;
z1._xscale = ZoneScale;
z1._yscale = ZoneScale;
}
function GetNextZone()
{
var LastZone:Number = 1;
for (var RootObject in _root)
if (RootObject.substr(0, 4) == "Zone")
LastZone = (int(RootObject.substr(4)) > LastZone) ? int(RootObject.substr(4)) : LastZone;
return "Zone" + (LastZone + 1);
}
var ObjectSelected:String;When moving torches in UnrealScript, we set the object to either a moving or stationary state. The moving state updated itself every tick to the mouse’s position. Here, we can let Flash do all the work. Just like our custom cursor, we tell Flash to drag around our symbol. Flash will only drag one item at a time, so we hide our cursor symbol and reattach it when we’re not dragging something else:
function InteractObject()
{
var PrevObjectSelected:String;
//stop Interacting with existing object
if (ObjectSelected.length > 0)
{
DragObject("");
PrevObjectSelected = ObjectSelected;
ObjectSelected = "";
}
//find new object to interact with
for (var MousedObject in _root)
{
if (_root[MousedObject].hitTest(_root._xmouse, _root._ymouse, false))
{
switch (_root[MousedObject]._name.substr(0, 4))
{
case "Zone":
//find zones, but not the one we had clicked on
if (_root[MousedObject]._name != PrevObjectSelected)
{
ObjectSelected = _root[MousedObject]._name;
}
break;
}
}
if (ObjectSelected.length > 0)
{
DragObject(MousedObject);
return 1;
}
}
return 0;
}
function DragObject(ObjectDragging:String)
{
if (ObjectDragging.length > 0)
{
CursorInst._visible = false;
startDrag(ObjectDragging);
} else {
CursorInst._visible = true;
startDrag("CursorInst", true);
}
}
ModifyObject(), again, works just like the UnrealScript version. It determines what’s selected, then takes an appropriate action. For a zone, we modify the scale:
function ModifyObject(Param1:Number)DeleteObject() first calls InteractObject() to see if there’s something under the mouse to delete. If so, delete it, then start dragging the cursor again:
{
if (ObjectSelected.length > 0)
{
switch(ObjectSelected.substr(0, 4))
{
case "Zone":
_root[ObjectSelected]._xscale *= (1 + (0.1 * Param1));
_root[ObjectSelected]._yscale = _root[ObjectSelected]._xscale;
break;
}
}
}
function DeleteObject()Finally, a new function SwapObject(). This will swap an existing zone for another. It simply records the properties of the selected zone then passes those to SpawnZone(). Since it’s inserted at the same level, Flash removes the old one for us. The modifier we pass in determines which direction we loop through the array of linkage names:
{
InteractObject();
if (ObjectSelected.length > 0)
{
_root[ObjectSelected].removeMovieClip();
DragObject();
}
}
function SwapObject(Param1:Number)
{
if (ObjectSelected.length > 0)
{
switch(ObjectSelected.substr(0, 4))
{
case "Zone":
var ZoneID:Number = _root[ObjectSelected].tabIndex;
ZoneID += Param1;
ZoneID = (ZoneID >= Zones.length) ? 0 : ZoneID;
ZoneID = (ZoneID < 0) ? Zones.length - 1 : ZoneID;
SpawnZone(_root[ObjectSelected]._name,
ZoneID,
_root[ObjectSelected]._x,
_root[ObjectSelected]._y,
_root[ObjectSelected]._xscale);
startDrag(ObjectSelected);
break;
}
}
}
Now, fire up the UDK Editor and reimport your BMHud SwfMovie. Make sure the package also imported all your circle images. I’m not sure when it was fixed, but the FrontEnd is now smart enough to detect the updated package so you shouldn’t have to manually copy it into the CookedPC folder.
Last but not least, by request, a way to toggle the debug text.
DefaultInput.ini
Bind a key for toggling debug mode:
-Bindings=(Name="Q",Command="GBA_ToggleTranslocator")BattleMapPlayerInput.uc
.Bindings=(Name="Q",Command="BMDebug")
Add a function for toggling debug mode:
exec function BMDebug()BattleMapPlayerController.uc
{
DebugMode = !DebugMode;
}
At the top add a declaration for a DebugMode variable:
var bool DebugMode;
BattleMapHUD.uc
In the PostRender() event, wrap the debug string and DrawText() in a condition:
if (bmPlayerController.DebugMode)Thanks for the suggestion DrZuess.
{
StringMessage = "NetMode=" @ WorldInfo.NetMode @ "\nMousePosition=" @ bmPlayerController.MousePosition.X @ "," @ bmPlayerController.MousePosition.Y @ "\nMouseOrigin=" @ mouseOrigin.X @ "," @ mouseOrigin.Y @ "," @ mouseOrigin.Z @ "\nObjectUnderMouse=" @ traceHit.Name @ "\nObjectClass=" @ traceHit.Class;
//`Log(StringMessage);
Canvas.DrawColor = GreenColor;
Canvas.SetPos( 10, 10 );
Canvas.DrawText( StringMessage, false, , , TextRenderInfo );
}
BattleMap mode source files